I finally finished the solar charger wiring. At the bottom of the picture you will see the display mounted in a radio shack enclosure. The wiring is all buttoned up with Velcro ties.
Another tedious job is finished as well. The Yaesu FT-857D is mounted on a special hand-crafted shelf. The head is mounted remotely. The unit is fitted sideways with the important plugins for digital mode devices such as the TinyTrac 4 APRS device and the Rigblaster Plug and Play. Neatly inset in the shelf out of view, is an MFJ Super Battery Booster to maintain the needed 13.8 volts for the radio even as the house battery bank sags with use. In the far right are a Rig Runner Power Pole distribution panel and a 7 port powered USB I/O distribution panel. Essentially, we are ready to clean and pack for the trip.
I even got a chance to climb Stone Mountain and see a beautiful sunset. Brrr, it was cold near sunset.
This is a frame for my video Sailing to the Tortugas. I placed it here as a reminder of better times on Belle. We'll not go into what happened later the night of this video. Sufficed to say, I was having good times aboard Belle that day. Now I look forward to even better times.
Right now, Belle is on her trailer at New Horizons as I mention earlier. I only hope they will "get a move on" and get the boat back to me so I can proceed with preparations for this trip.
Tentatively, my trip will be down the Gulf coast of Florida starting either at Cedar Key or perhaps at the town of Suwanee, at Millers Marina where I can have an even better place to wait out bad weather. The date for my trip is sometime in mid to late February after income taxes are resolved.
Here are some detailed projects that I am working on. They all seem trivial at the time. But each one has long a long-lasting impact on the success and comfort of my three month trip.
A simple thing like how much current an anchor light consumes can really make a difference in the daily budget for battery storage and replacement of electricity. So I just spent $50 at West Marine for 31 mm festoon LED lamps for my Perko fixed mount combination all-around light. The difference is in current use is sizable. The two LED's draw 200 ma, while the conventional bulbs draw 1.6 amps. With 11 hours of draw, conventional lamps would drop my battery banks by an astonishing 18 amp hours. The LED lights on the other hand, would set me back less than 3 amp hours.
I am replacing Belle's sound system with a modern all mode player which includes Bluetooth and USB access and control. This 200 watt unit is surprisingly inexpensive at $139. Juxtapose that with $50 for two little LED lights. I plan on having most of the 64 gigabyte I phone 5 full of music to stream by Bluetooth.
For USB distribution, I have a 12 volt powered 7 outlet USB I/O adapter. Next trip I hope to have a house computer system with LTE to WiFi continuous distribution. Now I will settle for a laptop and a netbook for my computing needs. There is an LTE antenna on the mast top which should provide good coverage for my Verizon MyFi hotspot. We will depend mostly on the Garmin redundant units for navigation doing separate trip planing on laptop and uploading way-points to the mapping units. Our software is SeaClear II which is free on the web.
Well that's enough for now. I will provide the provisions list when as we go. The goal is to be self sufficient in water and food for a month at a time.
It seems like forever! These ama's for Tridarka need to be carefully and methodically fared and filled with epoxy fairing compound. I generally buy this from Jamestown Distributors.
It is quite hideously expensive. So far, it is the only compound that goes on smoothly and sands reasonably well. Caveat: you must sand within twenty-four hours or it gets so hard you'd need a jack hammer. The weather is not exactly conducive to epoxy work at this time of the year. Although it seems like global warming is giving us longer and longer warm spells in the winter. Last March, most of the month was near 80 degrees.
This is what the cans of epoxy fairing compound look like. It takes a mix of A and B which color blends to let you know you have it thoroughly mixed.
So it's fill, fair, and sand until the whole ama looks good with a nice coating of paint. I will use hi-build primer so I can get even more fairing done. Funny how being retired makes it all take longer than ever.
Friday, December 7, 2012
Just a quick update. The solar panel controller box (by Blue Sky Energy)had two ungainly knockouts that pointed the wrong way for wire ingress. I also wanted to make the process neat, with easy connection/disconnection of panels and battery bank. I found this nice panel mount for eight power-pole connectors on the Powerwerks website. The nice gentleman, Kevin at ACK electronics cut the rectangular mounting slot. Close attention to the bottom will show I did end up using one knockout for the RJ-11 style patch cable that runs to the remote monitoring panel.
Meanwhile, Belle and her recalcitrant trailer are over at New Horizons checking out the leaking brake line and making sure the hydraulics works as advertised. (They completely rebuilt the brake system earlier this year). When she comes back, I will mount the controls for the solar system and button everything up. It's getting toward time to pack for the winter trip...if nothing else untoward transpires-:).
Meanwhile, the battery bank is back on winter maintenance while I finish the solar installation. The smart charger just doesn't like interference from other voltage sources and interruptions.
The dinghy inventory and inspection is finished. Here's the portfolio for getting around while traveling. Not the inflatable kayak is an expedition grade that is my primary conveyance mode when aboard. It stows easily under the Vee-birth out of the way. along with the paddles and the inflation pump. The six-foot dingy roles up into a tight small role on the fore-deck just behind the main mast, again out of the way. The motor is so small it stows in the lazarette.
This is the Innova Sunny inflatable kayak in it's back-pack carrying case. Ready to shoulder and go.
The dinghy roles up in a very small package for carrying on deck.
The little 2.5 hp. Tohatsu always runs well and stows out of site in the lazarette (stern beside motor-well)
Monday, December 3, 2012
The warm weather continues as I focus on getting ready for the winter trip aboard Belle. Since I completely redid both masts, removing all hardware, painting and reattaching all hardware, it seemed only proper to check the fit of the sails. Well they slide right up. I on the other hand am becoming more aware of the heaviness of the masts and realize I can only do this so long. For now, I look forward to the winter trip and am obsessing over the details of each supporting item.
I'm checking out the dinghy and the inflatable kayak to make sure my air pumps have connectors that fit and that all the little parts I need are with me. The dingy is a cute little six-foot inflatable that I have had for several years, but have never tried out. It is in mint condition. The former owners never used her from new. I did lack an adapter for the air pump so have it coming in the mail. Getting lettering to stick to the side of a folding item like this is almost impossible. I have used dinghy stencil in the past but never was happy with the quality of the paint. I chance upon some of that Flexi-seal, well not that brand but a Rust-oleum product costing about half as much. The rubber sticks great and is "flexible."
Sails are up and the solar panels are catching sun. I guess Karen was trying to stay out of this picture. Doesn't look like she was successful:)
Here's something I've wanted to build for a long time. The perfect plywood rack in a humidity controlled environment. We run a dehumidifier 24/7 here in the basement. Now for the plywood to use in those long anticipated building projects.
I took advantage of a warm day to painstakingly mold a 24 foot piece of e-glass tape onto the keel chine of Tridarka's second ama. (You will recall that Tridarka is our 21 foot trimaran sailing boat. The Amas are the outer hulls that keep it upright). As I previously explained the radius had to be re-sanded often removing most of the old glass which had not been properly saturated (epoxy starved). This is a nerve-wracking process of working against the clock while applying and squeegeeing excess epoxy. When I say hand squeegee I mean it. I used my gloved hand to mold and massage the glass around the tight corners. At least three applications of epoxy were added to make sure of the wet-out while urgently rolling out any runs and drips. Did I mention nerve-wracking?
Perhaps it's time to unveil our winter project. "Ha," you say, "don't you have more projects than you can do in a year already." Well, right you are. However the outside work on the bigger boats is at an end. So we bring out the plans for the Kiwi Puddle Duck racer. Karen is quite taken with the idea. It's a small 4'x8' sailboat that builds rather easily and is lateen rigged. I just happen to have the rigging from an old Sunfish which is just about perfect for the project.
Karen has already work her magic with a really nice and creative binder for all the research on our project.
I promise not to slum up the pages of this blog too badly with blow by blow stuff. If I do any detail stuff it will carry the appropriate warning so the reader may skip that edition of the blog.
Go ahead, drill a nice big hole in the side of your boat. Is it in the right place? If not, what would you do then? Are both sides of the boat the same? How do you tell on a rounded trapezoid?
Well there it is. It did turn out just fine after a couple of hours of timid check and recheck.
Next, what size are should the pilot holes be? How long should the screws be? It is balsa cored sandwich. Therefore the screw should end before the other side of the sandwich. Answer to what pilot hole size--Google like always. One-eighth inch for a #8 sheet metal screw.
Here's the base mount for the cable clam, a really nifty way to seal out the water. I had to bore a hole in the gasket block and slit the side afterwords. Then mounting the wedge gasket looks like this.
Finally the two nylon sections are screwed together compressing the wedge gasket.
You got to love good engineering! This is what the final product looks like.
Now that's what I'm talking about! Here is the latest addition to Belle's long term sail capabilities. I had suffered with a large, ungainly and un-achored solar panel which frankly posed a safety hazard and simply wasn't charging well anymore. So I decided to splurge and buy a set of stanchion mounted 85 watt panels.
This is quite an undertaking from an engineering standpoint and the electrical wiring standpoint. I will document my findings as I go
The #10 cable is daunting to work with but the waterproof box and weather tight fittings handle nicely once they are managed correctly. These kits come from eMarineSystems.com. I don't want to say that the directions leave a bit to be desired but, I dare say they probably think that if you can't figure it out, you probably shouldn't be tackling the job. Well, I'm just stubborn enough to think I can. So far, so good.
Here's the basis of the stanchion mount. With the Stainless cross bar these babies are here to stay. The are also fully adjustable for correct sun angle side-to-side.
Next comes the new Blue Sea modern three stage charging system. It will handle up to 25 amps so I plan on mounting the old solar charger (120 watts) on the bimini. This will give me about 17 amps total charge under ideal conditions. The batteries are well taken care of with the intelligent charge system. More to follow.
Sunday, October 21, 2012
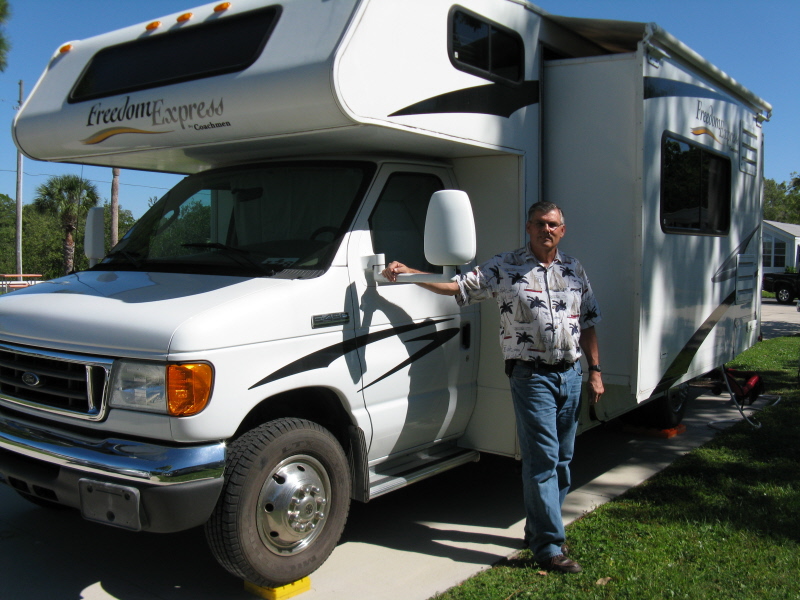
We took the weekend off to pick up our new RV. We are staying in Dunedin Carefree Resort.
Our friend Dan from whom we bought the RV and car helped us set up for the first time.
We also bought his Chevy Cobalt as a tow vehicle. Both are in excellent shape with low millage.
It's nice to have an economical care to run around in when we arrive at our destination. With apologies, we will be back on message with construction and boat projects next week.
Monday, October 8, 2012
It is a gray day on the lake. The wind cuts through our thin clothes sending chills through our bones. Never-the-less we are in good spirits. This is to be our final sea trials--we hope.
The good news: in the just barely down position, which usually nets the larges leak we have a bare seep , not even a trickle working its way through the rubber gasket material, We feel that this is good enough, as good as we can hope for. We'll crank down a little harder on the lag bolts and hopefully even that will cease. Actually, I never run with the board in the partially deployed position so I should really never have a leak.
Karen approves.
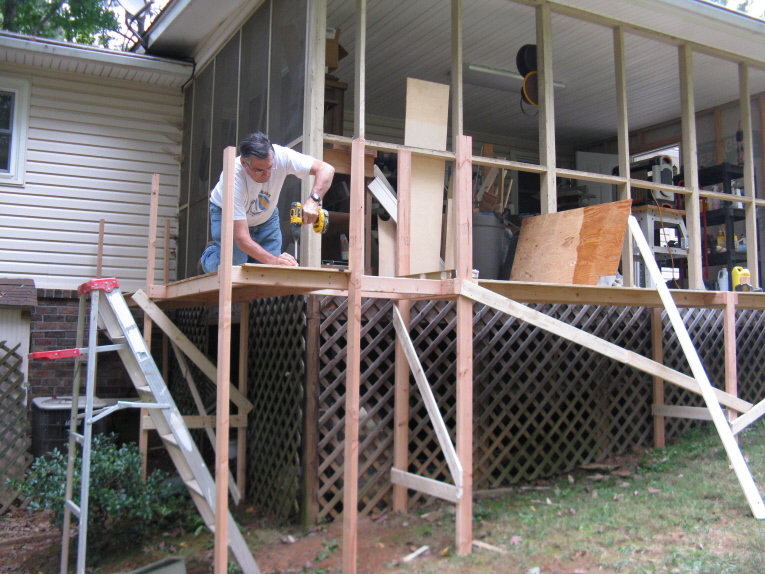
After we put the boat away it's back to scaffolding building. We will have this shop dried in by this next weekend! All the studs have to be replaced and windows have to be framed in. This is really turning into a big job.
So there it is, the siding job so far.
We heading for Florida October 20 to pick up the RV. Things are looking up!
It's getting toward winter. I hate that my building spree will be slowed and finally stopped by the cold weather. With this in mind, it's time to close in the shop.
After re-framing the entrance to the shop, I wrap the end of the shop with Tyvek.
Getting the siding to fit the crooked lines of the house and shop is a real challenge
Finally, this end of the shop is closed in with a door in place and trim applied and caulked. The rain and the lateness of the day sent us inside. I'm really tired after all this activity in one day.
Tuesday, September 25, 2012
After 6 "man hours" of sanding of which Karen did at least 4, I have applied a coat of epoxy to the entire surface. The key to a good coat with no runs is a good roller from West Systems, a moderate amount of epoxy spread evenly (think wall painting). You have to go over the coat with roller about 3 times to even it out and make sure there are no runs. epoxy applied with brush always runs and must be mopped up with roller!
By rights, a second coat should be applied while the epoxy is "green." This gives a chemical bond instead of a physical bond that you see with a second coat on a finished coat well sanded. I'm afraid I don't have time for that as I have to meet Karen at 5p for dinner. Tonight is ARES meeting and we have to be there early to practice "digital modes" for our upcoming annual "SET" drill (an nationwide Amateur communications disaster simulation drill).
Sunday, September 23, 2012
Now we are focusing on getting Tridarka back up and running. Karen is hard at work sanding one of the amas.
We got tired of having the ama slide all over the horses so I made a couple of low horses and a jig to secure the amas in the upright position. Here you see the ama treated with a stripper compound so we can remove the old varnish which is pealing off. I suspect that it was applied without washing the amine blush off before application. The sander just wasn't getting it off so hence the stripper.
Karen has the shop looking nice and clean. Having a clean and well organized shop makes all the difference in efficiency.
For my dear friends that I left working in 3G/4G CCU. I hope you can see I am enjoying retirement already. Sleeping nights is great. I want to thank all of you for my two retirement parties. Special thanks goes out to Phyllis Lowery, Michelle Gray and Nina Stefanie for arrangements. Thanks to all of you from both 4A/5A and CCU that came to my party at Los Loros. I will always remember you!
Here's my redone Porta Bote with casting deck and chair. Note rod holders and rapid deployment anchor hanger. The trolling motor is ready to go as well. All I need is a bait can with aerator. Sea trials coming soon.
This is what it looks like on the water.
Sitting in the casting chair using the trolling motor.
Monday, August 27, 2012
Ok, what does this picture have to do with the boatyard and sailing? Well, not much. I just had to show off my new mower. The old one was 20 years old and finally went kaput. I decided that as I get older I need something I can use to get this acre and one half of lawn done, and done quickly. I don't need to wrestle a monster every time I mow.
I took delivery today. The delivery crew quipped "now that's a mower." My reply, "you mean like Crocodile Dundee, Now That's A Knife"
"Yes, that's it, they responded"
Yes, I am like Tim The Tool Man Taylor. I like big, powerful toys.
Here's the new casting platform for the 12 foot Porta-bote. Notice a swivel seat, which is easily removed for open deck casting with a fly rod. A snorkeling and diving ladder which is also easily removed. The 30 pound thrust Minnkota on the trolling mount. There is an anchor fitting and quick release built in. There are to rod holders. Quite and impressive package for a 12 foot boat.
Meanwhile the transom boards wait for refinishing until I get a day off. I can't wait to do a picture layout on the water with the PB in action. I'll be back on the job next Wednesday!
Just a quick summery (from work, no pictures) of what I'm doing these days.
The projects have spread a little. Imagine that in this yard. Now I am rebuilding the two transom boards for the 12 foot Porta-Bote and setting it up for a portable fishing boat. I want to have a boat even when I am pulling the travel trailer. Also, I think the tricked out PB will make a great small lake fisherman for lakes where the max power is 10 hp. I use 6 hp on the Porta-Bote which gets her around and a gratifying clip. The new deck came from the factory this last week. I wanted ever so bad to install it and try it out. But I ran out of supplies for sheathing the transom boards. Well, it's all here now and I only have one day off between my weeks. So I guess my fantasies alone will have to do. The new casting deck includes a swivel chair--up high, an anchor fitting, a trolling motor mount, two rod holders and a boarding ladder for scuba and snorkeling. It really looks very cool!
Supplies for sheathing just came in today from Duckworks. I got 30 yards of 54 inch 6 oz E-glass and 50 yards of 6 inch bi-axial tape for sheathing the edges. Bi-axial is supposed to mold to corners more readily. So I anticipate a nice job on the outside transom. I will have pictures of all these efforts as soon as I get a stretch off to get some work done.
I am quite excited to report that I found a wonderful source for marine grade plywood. It is Suwanee Lumber Company over in, where else, Suwanee. It is high quality fir. Yes I would rather use one of the African mahoganies. But at nearly double the price of fir plus exorbitant shipping, using the good stuff for my projects which are mostly down and dirty jobs just doesn't compute. I can still have the waterproof glue and A/B finish but not the high price and a finish I would leave natural. Nothing wrong with paint you see. I have a couple of new building projects coming up next year. But if I describe them now, you all will think I lost my mind. So, more on that later.
Belle needs a final water trial as soon as possible so I can take her of my list to do. Then I'm going to plug away at getting Tridarka and Embers Watch up to par.
Darn if the tensioning belt on the lawn mower didn't go out just in the peak grass growing season--with all this rain. The mower is over 20 years old so no parts available. I am going to try to cobble something together and keep it going another year. Meanwhile, the grass grows.
More later after this work spell.
Today I sanded down the rudder repair block to shape. The curve was drawn from memory of the old shape. The NACA foil was approximated by carrying the taper of the foil shape down horizontally. I really doubt much lift is achieved this low in the board. The main goal is to reduce energy robbing eddys (turbulence) from forming due to sharp edges. That is the reason for the rounded off trailing edge and rounded of foot.
Unfortunately, I am out of Interlux two part epoxy fairing compound. I will fair and sand until very smooth. Then I will use e-glass 6 oz cloth and encapsulate with epoxy. Next I will use the yellow cloth you see in the picture which is Kevlar and sheath the surface that might drag in shallow water. This will protect the wooden board from intrusion by water. Finally I will fair over the entire surface blending the margins of the glass. Kevlar cannot be sanded so it has to be faired up to the protruding margins much as I did with the centerboard on Belle. When finished I will coat with 2-3 applications of Interlux Interprotect 3000/3001. The final coat will be Awlgrip off white above the waterline (because I have a can of it and antifouling below the waterline. I haven't yet decided on a color for the antifouling. Meanwhile I await an order from Jamestown Distributors.
Update: I found the cans of Interlux two part epoxy fairing compound.
So here is the rudder, faired and with the Kevlar edge glassed in place. The hot weather had the epoxy kicking fast--so fast the pot was burning my hand. Luckily we got it done before it set.
And the UPS man brought my cyanoacrylate glue. I was able to mend the chip in the mast track.